NEWS, EDITORIALS, REFERENCE
CMD HD, SCSI2SD Upgrade

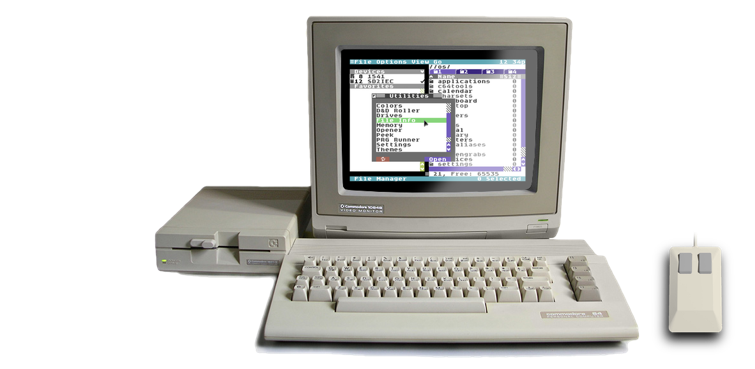
First a quick update. Work on C64 OS is continuing apace. I'm now working full bore on the Toolkit. The structure of objects is worked out, and working out well. Hit testing is implemented, sizing and anchoring, resizing and the whole context drawing system are working. I've implemented the first few Toolkit classes and anticipate that I'll be able to hammer out a few more relatively quickly. After that, I'll be able to start putting together those applications and utilities that have a more complex UI, that I've not wanted to start working on until the Toolkit is available to lean on.
However, my creaky old SCSI harddrive has been giving me SCSI controller errors periodically, it makes strange noises every now and then, besides being generally very loud, and to make matters worse, it has about 3 partitions that are totally corrupt. I tried to acquire a CF Aztec Monster a year or so ago, but was unable to find a reliable source. I placed an order from, shall we say, an unreliable source. After giving me the end runaround for a few months, I cancelled my order and submitted my whole exchange to PayPal to try to get my money back. They refunded the money in full. That was a close one.
The CF Aztec Monster being unavailable, I decided to order a SCSI2SD which are available from numerous trustworthy sources, including AmigaKit.com. The short story is that transitioning my CMD HD to the SCSI2SD was an enjoyable, plainless, and successful process. I did not require the use of any computer other than my C128 to do it. And I'd love to walk you through how I did that and what tools and software I used.
Before we get going on this post, just a quick reminder than the Commodore Logo Patches are back in stock. These are high quality embroidered patches with an iron on backing. You can order these directly through this site over in the Buyer's Guide. I also have a few Versa64Carts still in stock, which you can also order from the Buyer's Guide. Ordering one of the select items I'm selling helps to support C64OS.com and my work here.

A drive on its last legs
If you're unaware, the CMD HD was a commercial harddrive product for the Commodore 64 and 128 from Creative Micro Designs. I'm not sure exactly when it first became available, however it was produced and sold all through the 1990s. I got mine, a CMD HD-40, around 1994. The CMD HD, like many of CMD's flagship products, came in a professional metal case and included a very detailed manual in a small format three-ring binder. The case holds the main controller board along the bottom, much like all of Commodore's external disk drives. The main controller board is a 6502-based computer with 64K of RAM, a small boot ROM and serial controller. The case also housed a 50-pin 3.5" SCSI harddrive mechanism. Mine, the CMD HD-40, was so named because it originally shipped with a 40 megabyte drive. Around the end of the 90s I replaced the mechanism with a 1GB version that I've used in it ever since.
I've had a few harddrives over the years just die on me for no reason other than that they seem fragile. This has made me slightly paranoid that this drive may croak at any time.
When I first returned to the C64, after my hiatus, in 2016, one annoying shocker was how loud that harddrive is while it's doing nothing more than spinning. I guess I'd gotten used to more modern harddrives that naturally spin more quietly, or even SSDs that make no noise whatsoever. It took some getting used to, but you do get used to it.
Somewhat more worryingly, every so often, in the last 6 months, the CMD HD's front panel error LED would start blinking. Check the error channel and I'd get the terrifying message, SCSI Controller Error. Fortunately, it was only ever temporary and the drive would resume working shortly thereafter.
I didn't like a couple of partitions that were up high up in my partition table, they weren't serving any purpose, they weren't of a useful size and they were just bugging me. So, in the final coup de grâce, like an idiot, I decided to use a tool that I didn't entirely trust that promised it could remove a partition without disturbing the others. I put it to work removing a partition and it was chugging along taking much longer than I'd thought it would. It ran for at least an hour or more, and then all the activity lights stopped, but the program indicated it was still working. Shit. SHIT. What to do? I left it for like another hour in hopes it would resume. It never resumed, and it really appeared to me to be stuck in whatever state it was in.

Dude. Uhh… where's my partition?
With this terrible pit in my stomach I power cycled the drive and prayed to god everything would still be there when I booted back up. At first, everything appeared to still be there. What a relief, my main coding partition, the one with all my C64 OS source code (I do regular backups, don't worry,) was still there. But a few days later I went to access a tool I keep in my 9th partition, and I got a driver error. Uh oh. When changing to partition 9, and trying to list a directory, the error channel was come back with "Drive Not Ready." Fuck. So I meticulously went through all my partitions and checked them out. 3 partitions were totally hosed. One, the directory would load, but it was just a garbled mess. And two others were giving the Drive Not Ready error.
I've hobbled on like this for another 6 months, my tools partition was totally lost. I didn't bother to try reassembling my set of tools, because I knew sooner or later I'd want to migrate off of this old SCSI mechanism.
Migrating to a new mechanism
After my botched attempt to acquire a CF Aztec Monster, I sprang for a SCSI2SD. There are a few different versions of this on the market. I bought a v5.1. The basic idea is that these are circuit boards in roughly the same footprint of a 3.5" harddrive mechanism. They have a power connector and a 50-pin SCSI pin header on one end, but on the other end they have a socket for a more modern solid state storage device. The CF Aztec Monster was to bridge SCSI to a Compact Flash card. The SCSI2SD, naturally, does the same thing but bridges to an SD Card. If one of these cards is installed inside the drive bay of, say, a PC or Amiga desktop or tower case, you can get a front panel that gives you external access to the SD Card. That's pretty cool.
While I had been waiting for my CF Aztec Monster to arrive, (which never did,) I poked around the net looking for information on how to create a DNP file. DNP files are named after the family of D64, D71 and D81 disk image file formats. But DNP stands for "Disk image Native Partition", because it is an image of a native-mode partition from any of the CMD storage devices. Now, if you actually have a working DNP file on an SD2IEC device, the sd2iec firmware has support for mounting the image just as it can mount D64/D71/D81 images.


If you want to know more about what your SD2IEC can do, by the way, I wrote an extensive SD2IEC User's Manual. Please spread the word about the existence of this manual. And if there is interest in seeing it reformatted to PDF, so that it can be printed and used in paper format, let me know. I have interest in doing it, but I don't want to waste my time if no one cares about such things.
Somehow I had to backup my existing 8 or 9 native partitions. I, quite by accident, stumbled upon a program by Bo Zimmerman and André Fachat. Bo is responsible for, among many other things, the wonderful ZiModem WiFi Modem firmware, and André is the brains behind GeckOS. So this program was written by some smart dudes. I think I found it bundled with the C64Net Wifi programs and utilities disk. It's called emutil. Emutil is written in BASIC, but it has an ML component, in data statements, that performs most of the low-level work. When the program starts up it pokes the machine language routines into memory, and then presents its main menu.1
You pick a source device and partition number (0 for current), and you pick a destination device and partition. It has some other nice features, it can create a single or multi-file disk image, and can even RLE compress the image. It can create an image file on the destination disk from the source partition, or reverse that process, and restore a partition by unpacking it from a disk image. That's just what I was looking for.
I used it to create a disk image backup of one or two of my 16MB native partitions. But, I found it to be a bit slow. It took many hours to complete the backup of just one partition. After a few email conversations with Bo, I figured out that a DNP image (just like D64/71/81 images) are just the set of all the tracks and sectors, in sequential order, packed end-to-end in the image file. In a native mode partition, it starts at track 1, and has sectors from 0 to 255. Then it goes to track 2, sectors 0 to 255, all the way to the end of track 255 sector 255. (Which I suppose is 64KB less than 16MB given that it's missing all of track 0.)
If you're curious, the CMD storage devices aimed to be compatible. The way they are designed feels like the natural evolution of the 1541/71/81 and their file systems. Directories are structured the same way. Files are made of singly-linked chains of blocks. Each block is 256 bytes. And the first two bytes are used to point to the track and sector of the next block in the chain.
The main differences are: The addition of a new file type, DIR. The directory entry for a DIR file type, rather than pointing to file, points to the first block of another directory. And native partitions can have up to 255 tracks with 256 sectors each. Do the math, 255 * 256 = 65,280 blocks * 256 bytes = 16,711,680 bytes or just a hair under 16MB, which is the maximum size of a CMD native partition.
With this knowledge in hand, I decided to try and write my own DNP packer. I called mine MakeDNP. It's much simpler than emutil. MakeDNP has essentially no user interface. You use the JiffyDOS target device command (@X) to set the destination device. Then you can set the destination device's current partition and path for where the image will be created. Next you switch to the device you want to copy from and set its current partition. JiffyDOS has the concept of a current device, you can set it with the command (@#) or by holding CONTROL and pressing D to cycle through the devices. Then you just run the program.
It outputs one filled block character after it transfers a complete track. So for a 16MB native partition you can expect there to be 255 characters printed to screen, and this just gives you some visual indication of its progress. The filename on the destination device is always image.dnp. After the transfer is complete, you rename it using standard DOS commands. So, MakeDNP is simpler, with fewer options and very minimal UI, but it has an advantage. It's much faster than emutil. It actually shaves off a couple of hours! Emutil was taking over 6 hours to pack a full image, MakeDNP finishes in around 4 hours.
There is another advantage to creating a very simple UI-less MakeDNP-style program. If you assemble it to some high memory address, like $C000, you can then use BASIC like a scripting language. Write a FOR-loop over your partition numbers. Use the @X and @# and @CP commands in the BASIC FOR-loop to setup the source device and partition and the target device. Then SYS to $C000. Upon return, use BASIC to rename image.dnp to partitionX.dnp, loop and repeat for all your partitions. Then just sit back and let it run on its own for a day or two. Anyway, I didn't do that. But, it would be the poweruser move on the C64.
Instead, I used MakeDNP, manually, once per partition until I'd backed them all up. Note also, that we're backing up 16MB partitions to an SD2IEC with a 1GB SD Card. That card could hold up to 64 such partition images, and I only had about 9 to backup. So I don't need the feature for splitting the image into multiple files. I assume the multi-file feature is so you can backup a large harddrive partition or large disk to multiple smaller partitions or disks.

After copying the native parititons, I copied the 1541 emulation partitions too.
The other feature of emutil is to compress an image when writing it. And that is very cool. It would save space on the destination device and on a nearly empty partition that probably would have sped things up. The only problem is that SD2IEC can't mount a compressed image. And that means it would be hard to confirm that it worked properly. I really like the idea that I can mount the backed up image on the SD2IEC, navigate the file system some, boot up C64 OS from inside the image, and really see that it worked.
After Sutehk1 read and appreciated this blog post, he pointed out to me that I never made the source code (nor even the binaries) available to these imaging tools that I wrote for myself.
They are now available at here, on github.
Additionally, you can download them right here. The .a files are in the TurboMacroPro binary file format. The .o files are their assembled programs, ready to be loaded and run on a C64. The .bsc and .note files are C64 BASIC programs.
- maked64.a - TMP source code for MakeD64
- makednp.a - TMP source code for MakeDNP
- unpackdnp.a - TMP source code for UnpackDNP
- maked64.bsc - BASIC version of MakeD64. It works, it proves the concept, but is incredibly slow
- maked64.o - Executable assembly version of MakeD64
- makednp.o - Executable assembly version of MakeDNP
- unpackdnp.o - Executable assembly version of UnpackDNP
- makedxx.note - BASIC program with notes on how to use MakeD64 and MakeDNP
Opening up the CMD HD
With all the data safely backed up to an SD2IEC, it's time to open up the CMD HD, pull out the old SCSI mechanism and install the new SCSI2SD in its place.
The CMD HD has a nice little array of ports on the back. The 25-pin SCSI port is so that you can connect your CMD HD to a Mac or Amiga, (or PC with a SCSI card.) And the CMD HD-DOS has support for "Foreign Partitions." These are basically just regions of the disk set aside to be partitioned and managed by other computers. So you can actually share your CMD HD between, say, an old Mac and your C64.


The giant DIN port labeled PARALLEL is to connect the CMD HD to a CMD RamLink. Since the RamLink is connected to the C64's expansion port, standard KERNAL calls get their data routed through the RamLink and it dramatically accelerates the CMD HD. But anything that bypasses the KERNAL and uses the serial port directly, well, that'll work too, because it's connected to the serial port at the same time. With a RamLink and the parallel cable, a CMD HD is much faster than an SD2IEC. This thing is quite well designed, they thought of almost everything.
The only other port that'll be unfamiliar to most people is that IEC-look-alike labeled AUXILIARY. The HD-DOS that shipped with the drive didn't make use of it, but the Maurce Randall HD-DOS update was going to finally implement it as it was intended and as discussed in the User Manual. I'm not sure if Randall ever released his update to HD-DOS before he disappeared from the scene. If he did, I was out of the scene during that time. Anyway, the intention was to be able to create a "Printer Buffer" partition type on the harddrive. And then hook an IEC printer or printer adapter to the auxiliary port. The CMD HD itself would pretend to be a printer on the IEC bus. But when you printed, there would be no delays waiting for the physical printer to do its thing. The CMD HD would suck the print job in as quickly as possible and stash it in the printer buffer partition. Then it would report to the computer that the print job was done, freeing up the C64 for other work, and the CMD HD itself would slowly spool the print job out the aux port (which is independent of the main IEC bus) to the real printer. Very clever.
Now let's crack it open.


That's pretty straightforward. There is a small board affixed to the front panel to support the control buttons and LEDs. It's connected via a small ribbon cable to the mainboard right near that battery. The battery is used to backup the RTC. The 25-pin SCSI port on the back has its ribbon cable go down to a pin header on the mainboard. The mainboard also has the 50-pin header with a ribbon cable that connects to the SCSI mech.
The power for the mech is via a pretty standard looking black/red/yellow/black power cable with a white molex connector. You can see that the mechism isn't as wide as the mounting brackets. Originally there was a long screw with a sheath that would support the mech from the far side. I long ago lost the screw, but it seems to work fine without it. Just don't vigorously shake the whole unit.
When you pull the mechanism out, you can see all those beautiful through-hole chips on the mainboard. This, unfortunately, made the cost of the CMD HD non-competitively expensive as the 90s rolled on. These boards were assembled by hand by the guys at CMD. Nowadays, an SD2IEC is very tiny with all surface mount components. They can also be assembled by chinese fulfillment companies, which explains why they're an order of magnitude less expensive than a CMD HD ever was.
There are upsides and downsides to the SD2IEC. They use a more modern, more advanced microcontroller. This means they can have their firmware updated, flashed in place. And it also means they can support more advanced file systems with translation features like transparent support for .Pxx and .Sxx files on a FAT16 file system. But, on the other hand, it's not an actual 6502 (nor is it emulating one) like the 1541/71/81 and CMD drives had. Which means, any software that tries to install and run its own routines on the drive is going to fail.
Note also that HD BootROM EPROM. Version 2.80, dated 1990. I don't think they updated the BootROM after that. However, the BootROM is really only enough to get the CMD HD to load its HD-DOS operating system out of the special system partition, partition 0. This could be updated easily, because it's stored as software on the drive mechanism. We'll come back to this shortly.
Installing the SCSI2SD into the CMD HD
What came in the package when I ordered my SCSI2SD was just the main board, in an anti-static bag, and a power cable. The onboard power connector is not a standard male molex connector such as typically found on a harddrive. Instead it's the smaller connector typically found on a 3.5" floppy drive mechanism. The package included the power cable to easily connect this to a standard harddrive molex connector though.
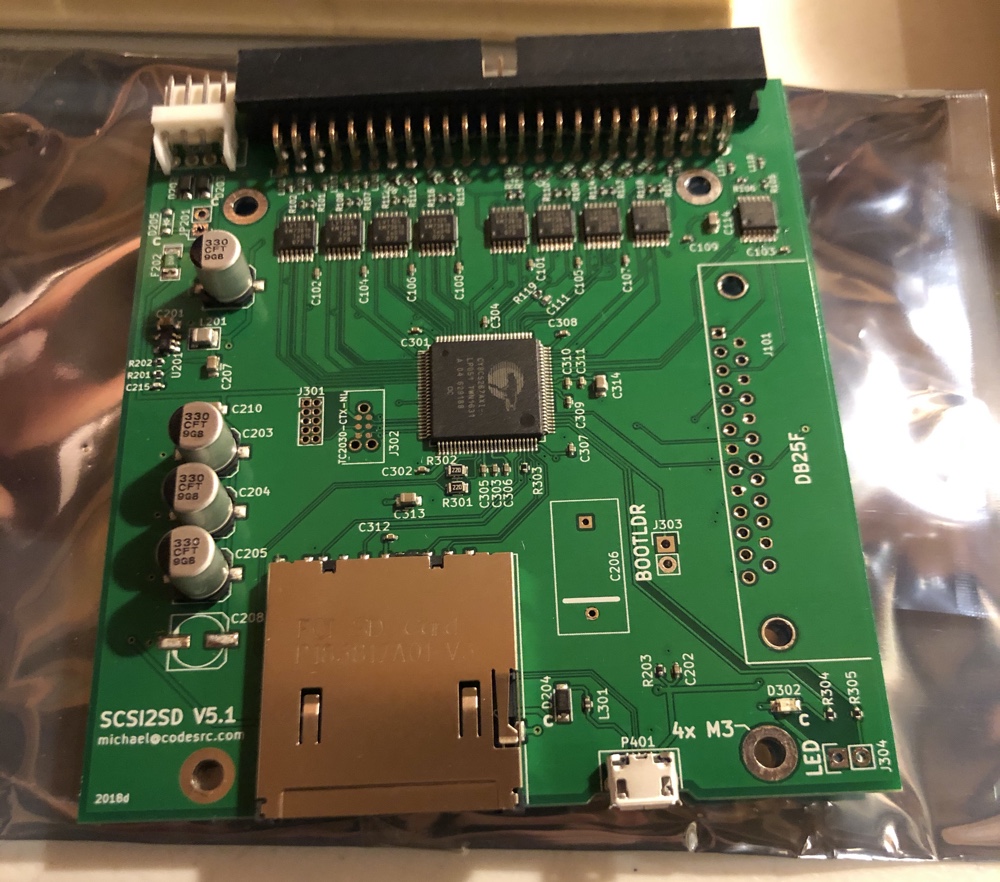

Typically a harddrive mechanism is thick, like an 3/4" to an inch thick, with mounting holes in the sides. These make it easy to mount the mechanism in a drive bay or in the CMD HD by passing screws through the bay sides and into the side of the drive. But, this thing is just a PCB. It's only a few millimeters thick. What it has though is a set of four mounting holes, but they're oriented vertically through the PCB.
What you really need is that mounting bracket, above right, sold by Corei64. They custom created it to fit the CMD HD and to mount the SCSI2SD safely and securely. If you do this upgrade, I recommend ordering one of these brackets. And, likely, I'll be ordering one for myself in the very near future. You can find it here, for $17.80 CAD + shipping.
But being that I was impatient and eager to get going, I rooted through boxes of all harddrive mounting brackets and found one that was appropriately sized. I believe this was for a 3.5" floppy mechanism, originally. I didn't care much about it, so I marked the position of the mount holes with a pencil and drilled them out. Then, using a bunch of hex standoff screws as risers, I mounted the SCSI2SD to the inside of the metal bracket.


I think it turned out pretty well. I also recently tore apart a SATA harddrive mechanism. It was fairly new, 500 gigabytes or something, but one that totally croaked a couple of years ago with the clicking glitch of doom. (This is one of those drives that died on me that I mentioned earlier, and one reason why I was so paranoid that my SCSI mech might go the same way.) I tried all the tricks to revive it, but it was truly dead. I've moved on and replaced that drive. But I decided to tear it apart to find out what the inside of a modern SATA harddrive looks like. Pretty minimalistic, to be honest! Especially compared to the controller board on that old SCSI mech.
But I happened to have pulled out of it a bunch of flat head hex-star screws. These screws threaded perfectly into the hex standoff screws I was using as risers. What luck. They make it look like the SCSI2SD was meant to be mounted in there.


Of course my next discovery was that the holes in the sides of the mounting bracket do not in any way line up with the mounting holes in the CMD HD. So, as it turns out, I wasn't able to use any of pre-existing holes in the bracket. The bracket isn't much more than a folded piece of tough thin metal.
I just seated it down to where I wanted it to sit, and traced through the CMD HD mounting holes with a pencil. And then (with the SCSI2SD not mounted) I drilled out those holes.


I love screws. I hate throwing away perfectly good ones. I have a wall mounted unit in my work room filled with those little pull out trays. Almost every tray is loaded up with sorted odds and ends. Many of the trays contain screws that have been rescued from other projects. I tend to sort my rescued screws into a few broad categories. Wood screws are separated from metal screws, tapered heads from flat heads, big ones from small ones. That sort of thing. I also, more recently, got one of those little plastic containers with 25 to 30 compartments for the really tiny screws.
I found a pair of metal screws with matching nuts. The screws have those godawful slots, ugh, but at least they have a hex head that you can grab with some pliers or a ratchet and socket. And I'm just as happy to get those slot screws into a project and out of my sight.


So, there it is. Mounted in there nice and tight. The SCSI2SD and mounting bracket are much lighter than the original SCSI mechanism. So affixing both sides is even less necessary than it was before.
Here's another thing to note. In that beautifully crafted Corei64 bracket, the bracket mounts into the CMD HD, and then the SCSI2SD board mounts down onto the bracket. The net result is that the SCSI2SD board sits much higher than mine is sitting. There is plenty of room inside the case for that. I could have mounted the bracket upside down with the SCSI2SD sitting up on top, rather than down inside the bracket. The problem is that none of the screws thread into the bracket itself. They thread into a nut on the other side. And, had I turned the bracket upside down, I wouldn't have been able to access the underside (at least not conveniently) to tighten up the nuts.
For a home solution, it works pretty well. But, just for the asthetics of it, I'll likely order a proper mount from Corei64 sometime.
Installing HD-DOS on the SD Card
Now comes the software component. We've got the hardware all mounted in place. I inserted one of several 1GB SD Cards I had on hand. The CMD HD can use up to 4GB of storage. But, in all my days I have never come anywhere even remotely near to needing even 1GB. I had around 9 partitions, 16MB each, plus a handful of 1541 emulation partitions, all combining to less than 150MB. It's crazy to me, still today, how spacious a 200MB harddrive would be on a Commodore 64/128. So I popped in a 1GB SD Card, which would be enough for 64 native partitions, maxed out to 16MB each.
Each of CMD's drives and other hardware shipped with a 1541-formatted utilities disk. There are several versions of the CMD HD Utilities disk floating around the internet in .D64. For example, you can find most of CMD's utilities disks on cbm8bit.com.


To use a new harddrive mechanism, or in our case, to use a new SD Card in the CMD HD, it has to be formatted, the HD-DOS has to be installed in the special system partition (partition 0), and the partition table needs to be configured. Additionally, the device number that the CMD HD should be on the IEC bus is stored in the system partition and can be changed with the utilities provided.
There are a few different levels of preparation you can apply to a new storage mechanism. For example, if the drive is already configured with partitions and data, you can update the HD-DOS version in the system partition without damaging any of your data. (I'd likely be scared shitless while the update was happening, but so they say, you can do it without losing your existing data.) For a brand new drive or SD Card, though, you can do the full monty with the provided utility, create sys.
I've only ever done this once before. When I upgraded from the original 40MB mech to the 1GB mech I'm just migrating away from now. It gives you on-screen instructions of front panel buttons to hold that put the drive into install mode. Once in install mode, it proceeds and tells you how big the disk is in bytes and blocks. And asks if you'll be sharing this drive with another computer. If you are, you can opt to start the system partition somewhere in the middle, and you can have it preserve data already in the lower portion of the disk. Even more scary I think would be trusting this software to not damage data you had installed on the disk from a completely different computer system, like an Amiga or Mac!
It proceeds, creates a devices table, creates a partition table, and then installs the OS from the utilities disk. A minute or two later and it's done. The default device number is 12, this is probably to prevent it from conflicting with disk drives you likely already have on device 8 and 9, and for good measure maybe even 10 or 11.
Upon returning to the READY. prompt, the JiffyDOS CONTROL+D cycles through the devices and #12 is detected. But if you try to load a directory you just get an error, 74, DRIVE NOT READY,00,00. That's because, you haven't created any partitions yet. Loading up the partition directory (@$=P) reveals that only the special SYSTEM partition exists so far.


To create partitions, and you can do this whenever you want, even after you've been using the drive with a set of partitions for some time, you use the included HD-TOOLS program.
Most of CMD's utilities have a similar, pleasing visual asthetic and are menu driven and quite easy to use. HD-TOOLS tells you how to put the CMD HD into configuration mode. Then there is an option to change the default device number.
You don't really need to change the default device number. You can use it on dev#12 just fine. However, for compatibility with multi-file games, the likelihood is they're going to be hardcoded to dev#8. You could, though, leave a 1541 on dev#8 and when you want to use the CMD HD on dev#8 you can press the front panel "Swap 8" button. This causes the CMD HD to swap device numbers with whatever is currently on dev#8. What's really neat about this is that you can swap the device numbers even after some arbitrary software (like a game) is booted. Most of this stuff was thought up to increase compatibility with software that was not written to play friendly with anything other than a 1541.
It shows this nice table listing the status of all of the device numbers. Here it shows that dev#10 is already taken. That's my SD2IEC, whence I was running HD-TOOLS from the CMD HD Utilities disk mounted from a .D64.


Next we can view the current partition table. Lo and behold, it's empty. There can be up to 255 partitions, so you can scroll through this list 16 at a time.
From the main menu there is an option to create a new partition. And, it's pretty easy. You pick from one of the available partition numbers. You give it a name, a type (Native, or 1541, 1571 or 1581 emulation) and if you pick native you can specify how many blocks you want it to have. Back in the days of a 40MB drive, it probably made sense for you to think this through and plan out a variety of types and sizes of partitions to suit your needs.
With the copious free space on a 1GB Drive, or now SD Card, I have a different general strategy. I create a whole bunch of native partitions, and number them sequentially starting from partition #1. And I always make every native partition the full 16MB. I tend to divide the partitions into broad categories like: Tools, Games, Demos, Graphics, Audio, etc. After making my set of partitions, you see in the third image above what the partition table ends up looking like:
- C64 OS (and coding...)
- TOOLS
- NETWORKING
- GAMES
- DEMOS
- GRAPHICS
- AUDIO
- WHEELS64
- WHEELS128
Once upon a time, Wheels64 was my main partition, partition 1. But, I've long since stopped using Wheels (GEOS upgrade by Maurice Randall of Click Here Software) as my primary working environment. And now that I'm deeply into C64 OS and working hard on making it the environment that I will live and breath in, I've moved Wheels64 and Wheels128 towards the end. But, that doesn't mean I don't still use them. In fact, in the last few days, now that I'm back to having a reliable CMD HD, I've been loading GEOS/Wheels Applications and Desk Accessories, printer drivers and fonts, etc. into those partitions, and organizing them sensibly so they can be used effectively. Just like in the Golden Years of my late high school career, and the peak of my C64/128 use.
Restoring from backup
Now that the partitions are created, according to HD-TOOLS, the thing to do is to test and see that they are in fact working from the READY. prompt.


And indeed they are. Very cool. Now I have 9 empty 16MB native partitions.
The last and final step of the migration is to restore my partitions from the backup images on the SD2IEC. For this, emutil is ready to go. It can create backup images, and it can restore partitions or disks from backup images.
It's quite simple to use. You specify the source device number, that's the device that holds the disk image. And you specify the destination device number, the CMD HD's device number whither you want to write the image back to a real partition. In both cases it asks for a "drive" number. In classical CBM DOS the drive number was for specifying the physical drive mechanism in a dual disk drive, like the CBM 4040. The first mechanism is 0 and the second is 1. CMD cleverly adopted this feature of the existing DOS syntax and used it to specify not a drive mechanism but a partition number. Partitions can thus be thought of like multiple disks inside a multi-disk device. The sd2iec firmware maintained this, inspired directly from CMD's DOS, and you can access muliple partitions of an SD Card the same way. CMD and SD2IEC devices both have the concept of the current partition. You can set the current partition with the CP command. Partition #0 is used as a proxy for the current partition. So in a program like emutil you can specify a drive mechanism for a Dual Disk Drive, or you can specify a partition number for a CMD HD or SD2IEC, or, you can just set it to zero to use the CMD HD or SD2IEC's current partition.
It also includes a "Disk interface" menu option. When you choose this it asks you whether you want to interface with the source or the destination device. Let's choose the destination, that's the CMD HD. From the prompt you can type $ to list a directory. This directory will come from the current partition and current directory. You can use this to confirm where your image is going to be written to. If it's the wrong partition, then you can issue a CP command to change to the partition you're trying to overwrite, and use $ again to confirm the change.
When you choose Unpack an Image from the menu, it asks for an image filename. And then it proceeds to unpack the image. It gives you feedback for each track and sector it's working on. After you set it up, it ticks along, and it seems to be working.
Once again though, I ran into a little problem. I got it set up and it started restoring my partition at around 1AM. At that point, the computer is busy, so there isn't much else to do. I just shut off the monitor, left the copying to go overnight, and went to bed.
I came down the next morning to confirm that it had restored correctly. But when I got to the computer, I was a bit worried. Before I even turned the monitor back on, I knew something had gone wrong, because the drive activity LEDs were still on and blinking. Damn. Had it gone into some infinite loop? I cautiously turned on the monitor… Oooohh, I see what happened. I went to bed and assumed it would be done by morning. But, I'd only been asleep for 6 hours. By the time I came back it hadn't finished yet.
I had to drop the kids at school and go to work. So I left it running all that day. By the time I got home, it had in fact finished. And it worked! Indeed, that's great news, it really worked. But damn, it was taking even longer to restore than it had taken to backup.
Every track in a 16MB native partition is the same length (unlike on a 1541 disk). They're 256 sectors. So here's what I did. I started restoring my next partition using emutil but I pulled out a stopwatch. I measured the length of time it took to copy one complete track. It clocked in at 102 seconds. Multiply that by 255 tracks, 102 * 255 = 26,010 seconds. Divide that by 60 and you get 433.5 minutes. Divide that by 60 and you get 7.22 hours. Well, now we know why it wasn't finished by the time I woke up. Holy crap, 7 hours and 15 minutes.
There is a length of time that's not really a big deal. If it's going to take 3 hours then it doesn't much matter if it takes 4 hours. It doesn't make much difference, because if you're going to start it and go to bed, it'll finish sometime while you're asleep regardless. When you wake up in the morning you can start it on the next one before you head to work. And then when you get home in the late afternoon you can start it on a third one. And before you go to bed it'll be ready to go again. At that pace, you can copy 3 partitions a day. I have 9 partitions, I can complete the job in three days.
But if you start it when you get home from work, and it's not done before you have to go to bed, well, now you've just wasted an entire night of copying. Or, if you start it before you go to bed and it's not done when you wake up, you waste an entire day at work. So 7 hours and 15 minutes is substantial.
Just as I did with MakeDNP, I made a variant of it and called it UnpackDNP. It works mostly the same way. You set the destination device with the target device (@X) JiffyDOS command. You set the destination partition simply by setting the current partition (@CP). Then you set the source device as the current device (@# or CONTROL+D). To pick the image, you rename a backup .DNP file to the generic name, image.dnp. Run the program, and away it goes. The only output it provides is one filled block character after it's completed an entire track. And it goes as fast as I know how to make it go.
Using my stopwatch again, I measured how long it takes between the appearance of one track output character and the next. And it takes… only 48 seconds! Mutiplied by every track, 48 * 255 = 12,240 seconds. Divided by 60, is 204 minutes. Divide that by 60 and it takes 3.4 hours. UnpackDNP, for reasons I can only suppose, is more than twice as fast as emutil. If UnpackDNP were only a little bit faster than emutil, well, you know, who cares. But, considering that it saves just shy of 4 hours of execution time, it was so worth it to roll my own solution. To be fair, UnpackDNP and MakeDNP don't support other disk sizes, and don't support compression, etc. But, the next obvious suite of tools to make would be: MakeD81, MakeD71, MakeD64, and UnpackD81, UnpackD71 and UnpackD64. Then you can just load up the tool you need. UnpackD64 would try to open image.d64 on the source disk, and if you want to be complete about it, it could confirm that the size of the destination device matches the expected size of the image before it starts.
Final Thoughts
I'm now fully migrated. My old SCSI mechanism is set aside on a shelf. It still works, but it's retired. All my data is now on an SD Card, bridged by a SCSI2SD v5.1. And I've spent some time organizing my files and started to rebuild my tools and networking partitions that were corrupt on the SCSI drive. A nice little benefit, the SCSI2SD is perfectly silent. After getting used to the loud spinning whine of the SCSI harddrive, it's now almost eerily quiet.
I learned about disk images, and about emutil, and I learned about how to write my own disk imaging tools. In the future, I will likely release the source code for MakeDNP and UnpackDNP to the public on GitHub.
Hopefully someone out there with a CMD HD and a creaky old SCSI harddrive will find this post useful.
- You can find emutil here on zimmers.net [↩]
Do you like what you see?
You've just read one of my high-quality, long-form, weblog posts, for free! First, thank you for your interest, it makes producing this content feel worthwhile. I love to hear your input and feedback in the forums below. And I do my best to answer every question.
I'm creating C64 OS and documenting my progress along the way, to give something to you and contribute to the Commodore community. Please consider purchasing one of the items I am currently offering or making a small donation, to help me continue to bring you updates, in-depth technical discussions and programming reference. Your generous support is greatly appreciated.
Greg Naçu — C64OS.com