NEWS, EDITORIALS, REFERENCE
Context Drawing System

I mentioned very briefly in the previous post that I've been working on the context drawing system for C64 OS. Believe it or not, I first mentioned the context drawing system in September 2017, in the post Organizing a Big Module. Back then, I said this:
Drawing, in general, is a complex topic. So it's really hard to cover in a single post. I will eventually dedicate an entire post just to talking about how the drawing system works. Gregory Naçu — September 2017
Well, the time has arrived. This is that post in which I will go into detail talking about the context drawing system. The state of flux has calmed down and it is now pretty much in the state that it's going to stay in. The locations and names of the system calls have been worked out as well as the parameters they take. So let us dive into context drawing systems.
The Hardware Level
Whether we're talking about a text-based screen or a graphics-based screen there is at bottom a hardware level. Physical memory, out of which a graphics chip or chipset interprets data to generate the video signals necessary to put pixels on a screen. On newer hardware, exactly where that memory is and how the translating of memory to pixels works can be very complicated and is always several layers of abstraction removed from what the programmer is coding. On the C64 everything is much simpler, and it is easy to remove all the layers of abstraction and work directly with hardware. But we'll see why that isn't a great idea, and that even the C64 KERNAL introduces a layer or two of abstraction.
The C64 KERNAL doesn't provide anything for abstracting bitmap drawing. But it does for text-based drawing. And C64 OS's primary UI is also text-based, so let's start there.
The VIC-II chip has a native text mode. In this mode it reads screencodes out of a 1000 byte matrix, 40 by 25. Each screencode is in fact just an index into the selected characterset. The characterset is a 2K bitmap. There are 256 screencodes, therefore 256 indexes. Each character is composed of an 8x8 pixel square, or 64 pixels. 64 times 256 is 16,384 bits or 2048 bytes, aka 2K. One register in the VIC-II, $D018, is used to specify both the start of the 2K characterset, and the start of the 1000 bytes of screen matrix memory. I drew up this diagram on paper to help me visualize how the bits work.

If you're interested in that, there is a bit more detail about it in the post, Character Animation, under the section Drawing the Busy Animation.
The upshot is that these two regions of memory combined with the VIC's special color memory are used to generate the text-based video screen. Memory is accessed in very close to realtime, as each raster line is drawn, to build frame after frame. Therefore, all you have to do is poke a byte into screen matrix memory, and the next time the raster beam sweeps past that part of the screen, it will draw that character instead of whatever was there the frame before.
The video system in the C64, unlike modern graphics systems, does not manipulate memory in any way. The VIC-II is incapable of modifying memory, it only ever reads. Therefore it is the job of the CPU to do all of the updates, modifications and transformations of video memory. With some minor execptions. For example, an REU can be used instead of the CPU to move chunks of memory from one place to another. It can move memory into video memory, thus changing what the VIC-II will draw. This is particularly useful for C64 video players. A topic we'll return to at some point in the future.
Although you can very easily put a character directly into screen memory, (POKE 1024,0 for example to pop an "@" into the top left corner of the screen,) generally speaking this is not how you output content to the screen.
When it comes time for the KERNAL to output a message, like the READY. prompt, where should it put the R? Where should it put the E? The A, the D? If it were to put these into a fixed place in screen memory, what would happen when you enter a command like LIST? Where should it put your program or directory listing? Who knows how long it'll be, where will the next READY. prompt be printed? There is only one routine in the KERNAL that outputs the system messages, but it needs to put the messages to different places on the screen at different times, relative to what else is already there or what has come before. All of this, "what-is-currently-there" and the "what-has-come-before" is part of the context in which the next message will be printed.
Screen Editor
The KERNAL implements what is called the "Screen Editor." BASIC programs generate their output by abstractly backending on the screen editor. The screen editor is a very simple concept. It's like an infinitely long scroll, but you can only scroll through it in one direction. New content scrolls onto the bottom, and old content is moved up and out off the top of the screen. Once something is off the top, you can never go back up to it. One other simple concept is that, like the page of a novel, all textual content starts at the left. Successive content flows horizontally towards the right, and when it hits the right end of the line it wraps around to the left edge of the next line down. If there is not another free line on the screen to draw onto, all previous content on the whole screen is scrolled up a few lines, losing whatever was in the topmost few lines, and a few new blank lines become available at the bottom of the infinite scroll.
That's the concept of the screen editor. But, how does it accomplish this? Your program doesn't need to specify where the next printed character will end up on the screen (or where in screen memory it must go.) And yet, at any time your program is free to call PRINT and supply only the what to be printed, not the where. How does it do this?
The screen editor is more than just an infinite scroll. It tracks and maintains contextual information, and with each printed character this internal context is updated in preparation for the next printed character.
The screen editor maintains a cursor. The cursor should not be mistaken for that little square that blinks on the screen. That little thing is the cursor indicator. It's a visual cue to let you know where the data cursor is. The real cursor is much more fundamental than the blinking indicator. For example, you could put a BASIC program into an endless loop, reading and printing content out of a large text file, or from a modem, and each byte read would be output to the next appropriate place, even though throughout the process you never see the cursor's indicator.
The screen editor implements the cursor with several variables. The current line number. A pointer to the memory location of the first character of that line. And a column offset. It also has variables, or constants, for the dimensions of the screen. If you get a bit deeper into exploring how the screen editor works, you'll discover that it also builds and maintains a table of line pointers. This is because it abstracts screen memory into conceptual or logical lines that are 80 characters long.
There are several fun things you can do to play around with the screen editor to see some of these invisible traits come alive.


The first thing to try. Turn on your C64. Type a word, like TEST. Now move the cursor back to the start of the word and make insertions by holding the shift key and pressing the insert/delete key. As you would expect, the word TEST gets pushed across the screen. You can imagine that the string of characters are being moved through screen memory. That intuition is reinforced when the word hits the right edge of the screen and then flows, one character at a time, onto the line below.
You'd guess that this process could continue line after line until the word TEST gets to the bottom of the screen. But that intuition is suddenly disconfirmed when the word hits the end of the line below where it started, and can't be pushed any further. That's because two physical 40 character lines on the screen are managed as a single logical 80 character line.
Two more fun little experiements make what's happening make a lot more sense.

Anyone who's tried BASIC programming on a C64 has probably encountered this situation before. But what are we looking at? I've tried to enter a line of BASIC, but after pushing return I get a syntax error. When I list the program, there is no program at all!
The line of BASIC is 3 screen lines long. After reaching the end of the second line, the screen editor automatically moves the cursor into a new logical 80 character line. The only content in the new line is a fragment of english prose and a quotation mark. That's what generates the syntax error. Meanwhile, the line that starts with 10 PRINT was never input at all, because return was never pressed whilst the cursor was inside that logical line.
Let's look at one more to see what else the screen editor is doing behind the scenes.


As soon as you think about it for a minute, you realize it could never have been the case that pushing insert moves subsequent data one character a time through memory. If that were the case, then every character on every line would begin its rightward march. READY. prompts on following lines would begin moving towards the right as you inserted characters into a line above. But, clearly, this never happens.
But there is something else quite clever that happens. I wrote a short program, each line contains a few words from the famous Star Trek intro, and no BASIC line exceeds 40 characters. We can run the program, and then list it again. When listed, each line of BASIC is tightly packed one physical screen line after the next. But wait a second, we left out some critical words: "THE STARSHIP ENTERPRISE." It shouldn't be a problem to add those to the end of the appropriate BASIC line, because each BASIC line is allowed to be 80 characters long. Move the cursor to the end of "THE VOYAGES OF" and start to type out the rest. This time, when the cursor reaches the end of the screen line, the screen editor pushes the following BASIC lines down, opening a new blank line in the middle of the screen for the continuation of the line we're editing.
This is the only instance I can think of in which the screen editor scrolls on-screen content in the opposite direction from normal.
The point I'm trying to make, with this brief detour into history, is that typing at the READY. prompt is not merely the placing of one character after the next into subsequent memory locations. The screen editor is actually a fairly sophisticated abstraction that sits above the hardware layer. It internally maintains a table of line pointers. After pushing return you end up at the beginning of a new line, which is by default allocated as just 40 characters. But as you exceed 40 characters it is transformed into a full 80 character line by manipulating the line pointers in the table.
As content is scrolled up, or (under some rare circumstances) bumped down, the line pointers are manipulated to track their physical location in screen matrix memory. Numerous other contextual variables are maintained along with the cursor. Such as the current insertion color, reverse on or off, the insertion depth, the status of being inside a quoted string or not. And so on. There is way more there than meets the eye. And I'm sure the fact that this software was built into every Commodore 8-bit, available the moment you turn it on, was a big selling point, back in the day.
Modern Context Drawing Systems
In my estimation, the screen editor is a context drawing system. Albeit, a primitive one by today's standards. The crux of a context drawing system is that you supply successive and partial pieces of information, and that information is laid down into a lower level by being modified, relativized by what has come before.
Let's look at an easily accessible context drawing system today. The HTML5 canvas. I found a suitable example tutorial on this site: http://www.williammalone.com/articles/html5-canvas-example/. Because this is HTML and Javascript, you can create the canvas object and its associated details, such as dimensions and an identifier, as well as its invisible backend memory allocations for buffering the image, simply by creating an HTML page with a canvas tag and some attributes. Like this:
Next you need some Javascript to actually write code for the canvas. The example from the tutorial goes like this:

What you get is a yellow triangle, like the one shown above.
Let's face it, the code above is about a million miles removed from the actual pixels being put on a real screen. For a C64, it's a bit too abstract, but it does illustrate the point. Successive steps building up contextual information.
The first line gets a reference to the canvas's "context." Whatever that is, where ever that is, we don't really know, but that's a virtue of the abstraction, not a problem. Next, a couple of variables are defined, width, height and padding. These aren't necessary, but they make changing the appearence of the triangle a mere matter of tweeking a few numbers.
Then comes the real magic. Commands can be called on the context, one after the next. Each command adds detail to an underlying environment, each building on the one before it. It starts with a call "Begin Path." This tells the context that a shape is going to be defined. The context, internally, sets up a cursor. The "Move To" command is given to set the initial position of the cursor. Set it where? Set it relative to the image buffer. But where is that? Who knows. But that's not relevant. We know how big it is, because we declared that.
The next is a "Line To" command. This moves the cursor, but it also records that a conceptual line joins the two points. Note how the Line To command only provides the end coordinate. The start coordinate is already stored by the context from the previous command. Another Line To command is then given, with a third point. And lastly, a special command, "Close Path." This tells the context that building the shape is over. There is probably an assumed line that joins the final point back to the original starting point.
Lastly, there are two final commands. The first sets a property. In this case, a fill style as a flat color, and finally, the command "Fill."1 The context knows the position and shape to fill based on all the path details provided. And it knows the fill style. All it has to do is fill up the inner space of the shape with pixels of that color. This is all done into the image buffer created in the backend by the canvas object. When the HTML renderer comes along and renders the various HTML elements into a webpage, it treats that canvas tag just as though it were an image tag. Except, instead of getting the pixels of the image from an externally sourced graphic file, it gets the image instead from the tag's backend image buffer that was programmatically drawn into.
The HTML renderer has the job of compositing together all of the HTML elements. The contents of the canvas tag's image buffer, however, do NOT need to be redrawn each time the HTML renderer needs to recomposite the various elements. That would be much too slow. And this is relevant to C64 OS, as we'll get too soon.
A few notes about Canvas
- What happens if we plot a point that falls outside the stated size of the canvas? Answer, no problem! All drawn content is automatically clipped at the edges of the canvas. Plus, the canvas can be any size or aspect ratio. It doesn't need to be the size of the screen. Usually it is much smaller, but it can also be larger than the screen. Nor does it need to be the same aspect ratio as the screen. The screen can be 12:9, and a canvas can be 1:1, or 2:1, or whatever you choose.
- The HTML canvas has many more options besides what I discussed above. Just to stick with the path defined shape, there is more you can do. You can tell the context to draw a shadow around the shape. Or to stroke the shape, that is, to color over the lines. You can choose the stroke color, thickness, masking patterns, and corner join styles, all by setting various context properties.
- After you've set a bunch of context variables, sending one command at a time, it seems like it would be a big pain to have to unset them all one at a time to draw the next phase of the overall result. There is a solution for that. The complete current state of the context can be backed up by pushing it to an internal stack. Later, the context can be restored by pulling a back up from the stack.
- Lastly, I mentioned multiple drawing phases to build up an overall result. Rarely would you use the canvas to draw one triangle, and then be done. Half the point is to be able to build up complex images that are at least partly dynamic. The concept is that of coats of paint, being put down in layers. Usually you begin by clearing the context. Then you might draw a yellow triangle here, and then a blue circle there, and then an orange rectangle somewhere else. If any of the drawn things overlaps another, the later things are drawn above the earlier things, partially obscuring them. This is also known as, at least one form of, compositing.
Screen Editor Modern Comparison
Now that we know what the screen editor does and have a taste of what a modern context drawing system can do, we can at least talk about how they're different, and where the shortcomings of the screen editor lie.
First, let's think about how they're similar. They're both composited. Let's say you use the KERNAL's plot routine. You can use it to set the cursor's origin. Maybe we set it to row 10, column 5. Then we set a color by CHROUT'ing a PETSCII color code. And we do the same with the PETSCII RVS-ON code. Next we print out a string of 20 characters. Each character draws itself out relative to that plotted origin. And the colors and reverse are taken into account for each new character.
After laying down that string, with those positional, color and reversed properties, we can later lay down another string. This time, we might set the origin via PLOT to row 10, column 15. Then we choose a different color and turn off reverse, and then print out a different string of 20 characters. These two ranges partially overlap. The latter partially obscures the earlier drawn string, leaving part of the original still visible.
They both abstract the underlying memory. Not only does the screen editor handle figuring out where in screen memory a PLOT will land you, but the KERNAL also supports changing the location of screen memory. Its default is $0400 to $07E8 (the last bytes, from $xxE8 to $xxFF are for sprite pointers.) You can set some KERNAL workspace variables to change this location, and the KERNAL's PLOT and CHROUT routines automatically handle working with the new range.
They can also handle relative references. Just as Canvas can plot a line from whatever was the previous cursor's point to a new point, the screen editor can move the cursor to a new location on screen, relative to the last. You'd think, well, big whoop. But it's not nothing. When I was a kid, one of the first BASIC programs I wrote, (when I actually felt like I was starting to understand what it means to program,) draws a large PETSCII art digital clock on the screen. There was only one routine that knows how to draw each of the 10 digits. But the drawing code produces the digit by adjusting the position of the cursor relative to where it is. The overall clock program being able to adjust the cursor relative to its own origin, to the start of a particular digit that needs to be updated. That's pretty cool.
But there are some serious shortcomings of the screen editor too. And I'm not just talking about the obvious ones. The screen editor is a text-based drawing system, so it's obviously not going to have the pixel precision of a modern system. And, it also lacks the ability to draw shape primitives. If you want to draw a box, for example, you have to write a short routine to reposition the cursor for each subsequent line, and draw the box as a series of rows. But that's not what I'm talking about either.
The biggest shortcoming of the screen editor, in my opinion, is its inability to clip the drawing to a bounds edge. What does that mean? Well, take the example of my PETSCII clock program. The drawing code knows how to draw any of the 10 digits, and uses the same code do draw a digit anywhere on the screen. You just set the origin, the top left corner of the digit, and boom, it draws the digit rightward and downward from that point. But, what happens if the digit is, say, 9 characters wide, and you set the origin less than 9 characters away from the right edge of the screen? What you really want is for the drawing code to not care, and simply to draw the same way no matter where it is on the screen. And if it's too close to the right edge, you want part of the digit to disappear, to get clipped, by the right edge of the screen. But, that's not what happens of course. The characters that overflow the right edge flow onto the left edge, one row down.
It's easy to see why it does this. Because the screen matrix is just a 1000 bytes of contiguous memory. But, from a drawing perspective, maybe that's what you want, but, maybe it's not what you want. The screen editor just doesn't have any provisions for that. It's just not that sophisticated.2
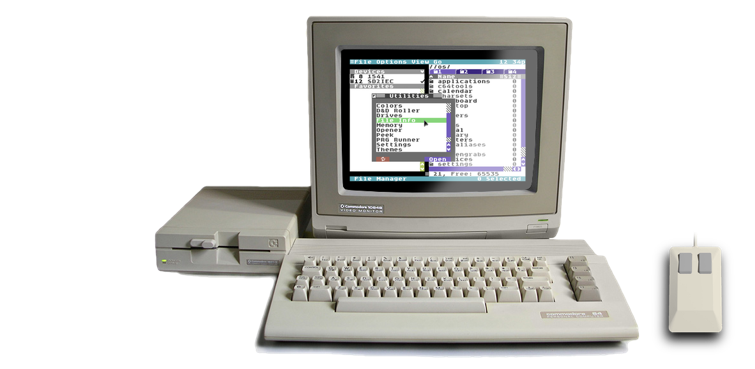
C64 OS Context Drawing System
At long last we come to the context drawing system that I've created for C64 OS. In many ways it is still very simple. It is still built on the text-based screen matrix, it's not bitmapped. But, it adds some much needed functionality that makes drawing a lot easier.
The system is divided into two parts, the buffered context drawing, and the context to screen compositor. You can think of the former in the way the HTML5 Canvas tag creates its own implicit image buffer. And the latter you can think of as the way the HTML rendering engine combines the various elements, each with its own buffer, together, composited according to their layer order.
Let's start with the buffered context drawing.
First of all, in C64 OS, you generally don't ever write data directly into screen memory. I mean, this is a C64 after all, there is no memory protection, so if you really want to write into screen memory, nothing is going to stop you. But generally speaking it's not a great idea. The reason is because the screen does not exclusively belong to one program. For this reason, the system manages recompositing the screen at opportune times, and in the correct order. Now you might wonder what all could be using the screen? Here are some examples:
- The menu bar
- One or more open menus
- The status bar
- A floating utility panel
- A system dialog box
- Or, splitscreen mode
Splitscreen mode is too complicated for this article. But suffice to say here, there are times when whole regions of screen matrix memory are not even being used to show the standard text-based UI, but are instead full of color data for Hires or Multi-color bitmap data!
To buffer, or not to buffer. That is the question.
The system redraws the screen in layers. Each type of code, if it needs to draw: application, utility or system code, reserves for itself a layer by pushing a layer structure into the system's screen module. The system then calls upon each layer to draw itself, when necessary, and in order such that the lowest (most background) layer draws first, then the next then the next.
Whatever is in the screen buffer is vulnerable to getting clobbered at any moment. This could happen when a menu opens up and draws itself into the screen buffer. Or a system dialog box pops up. What then to do when the system asks a layer to draw itself again? Let's say you have some data to display and you have some drawing logic, code that knows how to layout the data in a useful and pleasing way. You could simply make drawing calls right into to the system's screen buffer.
Sometimes this is a good idea, but, if the drawing code is slow, then it might not feel snappy enough to the user. The menu bar (and any open menus) and the status bar redraw themselves from scratch, from data, every time their layer (they share a layer) is asked to redraw. This is, in my opinion, fast enough. Because the menus draw above everything else and snap shut automatically, it's fairly rare when something on a lower level is rerendering below the open menus, forcing them to redraw. Although, I did write some sample code, which I showed off at World of Commodore and at the Kingston Retro Computing Club to demonstrate the realtime compositing. And even when required to redraw a few times a second, it's still fast enough.
On the other hand, lower layers are much more prone to disruption. Namely, from menus popping out over top of them all the time. The bottom-most layer, generally used for the application's main UI, is the most prone to disruption. It'll get disrupted by menus but also by opening a utility, and then all the more so as you start dragging a utility around. What's worse, is that the application's main UI may be of arbitrary complexity. Whereas, the menus are fairly simple. The menus usually occupy a small area of the screen and consist of a few rows of text of a consistent color that can easily be drawn straight out of the menu data structures with only a bit of overhead. An application on the other hand may have a full toolkit widget-based UI, with all sorts of varied colors and source content, consisting of 10s of view classes complexly nested together with 16-bit scroll offsets and content clipping.
If such an application UI were redrawing anew into the system's screen buffer every time the layer was asked to redraw, it would be forced to redraw 50 times in a row as the user picks up and moves a utility panel. The result is that it would be very slow. The utility panel would not track very smoothly beneath the mouse. (Albeit, it would still be better than GEOS, which, as a rule does not allow moving desk accessories at all.)
Using the screen buffer as your layer's drawing buffer, in other words, is possible but not always desirable.
How to create a buffered draw context.
In order for the context drawing system to draw, it requires the context. Naturally. You create a context structure in your code, and then push a pointer to that structure with the toolkit module's setctx system call. Here's how the context is structured:
The VIC-II separates its character data and color data into different regions of memory. So the context needs at least two pointers, one for character memory and one for color memory. These two buffers must be exactly the same size, because for every one byte of character data there is one byte of color data (even though only the lower nybble of that byte is actually used.)
Where these buffers are and how big they are is arbitrary. Usually, the character and color pointers point to the start of the buffers, that is to the top left corner of what the buffer represents, which we call the origin. However, they don't have to. These pointers can be moved to point to any origin which is inset from the top left of the physical buffer, which we will see in a minute. Because the buffer's dimensions and aspect ratio are arbitrary, it is necessary to specify how wide the buffer is. That's what the third property, buffer width, is for.
This requires a bit of explanation.
Let's say we want to have a region for drawing that is a square, 27 rows by 27 columns. 27 * 27 is 729. If we divide 729 by 256 (the number of bytes in a page) we get ~2.84. So we need 3 pages of memory for character data, and we'll have a little bit left over. But we also need a buffer for color data, so we need 3 more pages for that. Let's take a look at some code that can allocate these two buffers for us and return pointers to them.
We want to allocate 6 pages of memory to be our character and color buffers. We make them of the "mapapp" type, these will be automatically deallocated when this application quits, which is very convenient. Now, we could ask for 6 pages in a row, but, who knows, maybe the system can't provide 6 contiguous pages. And they don't need to be contiguous, so despite the small overhead of calling pgalloc twice, I think it's better to make two separate requests for 3 pages each.
After a call to pgalloc the Y register holds the page number of the first page of a buffer that's three pages long. This is effectively the high byte of the pointer. Because the context struct was initialized as all zeroes, we just need to write the high byte. This is done with the context+charorigin+1. Little Endian, remember, high byte comes second.
After setting these two pointers, the context has the character and color origins for a canvas to which it can draw. But it doesn't know if that's 1 row by 768 columns, or 2 rows by 384 columns, etc. By setting the buffer width to 27, that forces the canvas area to be 27 columns and therefore ~28.4444... rows. As it happens we only care for it to be 27 rows, so the extra row and a bit is the left over that the drawing system won't use.
Now here's a visualization of how this might look.

In this example, we'll pretend we're looking at the character buffer, and that the color buffer is similar, but at a different address. In this example, pgalloc returned $82. We wrote $82 into the high byte of the character origin address, giving a pointer to $8200 as the start of the buffer.
Now let's say you've got a cursor into this buffer, to draw some characters. There are calls to abstract all this, but let's think about it a little lower level than that for a moment. To move the cursor to the right is very easy. You just add one. To move to the left is just as easy, you subtract one. But how do you move down a row in the same column? You add the buffer width. This goes all the way to the end of the current row, plus the remainder of a row length on the row below, and you end up in the same column one row down. Or, you subtract the buffer width to go up a row.
This is exactly how it would work in screen matrix memory, where the buffer width is fixed at 40 columns. From any address in screen memory, except for the very last row, if you add 40, you get the address of the same column one row down.
However, that's not where the magic ends. A draw context in C64 OS is not only not a fixed buffer size (like 1000 bytes) or fixed aspect ratio (like 40x25), but the draw region within an arbitrarily sized buffer can be moved about too. You might have wondered, why is there both a buffer width and a width property? Looking at the visualization above, the blue outer square is the size of the buffer. And it has a buffer width of 27 columns. The red square is the actual drawing region which is fully contained within the blue buffer.
The draw region (red square) has an origin that is somewhere within the buffer, plus it has a width and a height. The width and height properties of the draw context struct define the width and height of this red draw region. However, the buffer width is still necessary. As you can see in the visualization, it doesn't matter that the draw region is inset from the top and left edges of the whole buffer, if you have a cursor, represented here by the small green square, and you want to move down a row, you still add buffer width. The two red arrows show that adding buffer width blows you out past the edge of the draw region to the end of the full buffer, then into the start of the next row down at the start of the buffer, and all the way back into the draw region, one row down.
Transforming the draw context
To define the origin of the draw region, you simply use the character origin and color origin properties of the context. When you do this though, you lose the initial origin values, the pointers to the starts of the buffers. This isn't a problem though, when it comes to drawing it doesn't matter how big the whole buffer is. As long as you adhere to certain constraints when adjusting, or transforming, the context. Let's think about some of these.
When you transform a context, you can only make it smaller. You know what the width is. (Not the buffer width, but the draw region width). This means you can always move the origin to the right, and not overflow the right bounds by shrinking the width by the same amount you shifted the origin. Same goes for up and down. You can always move the origin down, but only by as much as height, simply by decreasing height at the same time as moving the origin down until height becomes 1. It doesn't make sense for width or height to become zero, because then the draw region would be non-existent, and you could just skip any code meant to draw into that region, as it would have nowhere to draw.
Additionally, it makes no sense for the height or width to go negative. And in fact this is impossible because the context's width and height properties are unsigned 8-bit. This allows a drawable region to be a maximum of 255 rows and 255 columns. And because text cells are 8x8 pixels a drawable region in C64 OS can be a maximum of 2040x2040 pixels. That's a good limit for an 8-bit computer. If it were able to be bigger, you'd quickly run out of memory.
By following the constraint of only ever making the draw region smaller, whatever code is controlling the transformation never needs to worry about how much bigger it ought to be allowed to make it. But this is also why it isn't relevant to know the original origin, or the start of the physical buffer. If you want to make a transform, you can move the origin into any address that is within the current draw region, and that will always be valid. Or, you can leave the origin where it is and decrease the height or width.
Doesn't this lead to a problem? If you make the draw context smaller, and you lose the previous origin, and the previous height and width, how does it ever become bigger again? The answer to this lies in pushing and pulling the context from the stack. The initial code that creates the buffers assigns all the context dimensions to their maximum values. Whatever code allocates three pages for each buffer, that code also sets the initial origins (character and color) to the start of those buffers. And if those buffers are meant to be 27 by 27, it assigns the buffer width and the initial draw region width and height to 27.
If the main code, the same code that did the allocating and initializing, wants to draw into that buffer, it can just go right ahead and do that. But, imagine now that the main code wants to pass off the drawing task to some other code, such as to a generic toolkit view class. First you push the current context to the stack, then you can shrink and inset the context as appropriate for where that view should draw, and then call that view's draw code. At this point, the view class has absolutely no idea where in memory the buffer is. It has aboslutely no idea how its own draw region is positioned or sized relative to the surrounding buffer. All it does is draw using the draw routines, which we'll get to later, into the context as it is.
Now, what happens if that view contains a subview? Easy. The view takes the context as it is, pushes it to the stack for itself, and shrinks and offsets it some more according to where its subview is relative to itself. Then it calls that subview's draw routine... and this process is recursive. When the child view returns to its parent, the parent can pull its own context from the stack, and adjust it again for a second child at a different relative offset, or it can return to its own parent.
Just like with regular assembly routine calls, if a routine is truly finished, and has nothing more to do after its child is finished executing, it can call the child with JMP instead of JSR. When the child routine executes an RTS it will skip back up two levels. Using JSR immediately followed by an RTS is just a waste. The JSR pushes the return address to the stack, but the only thing returned to is an RTS. It is exactly the same concept with the view drawing. If you're a view, and you have 3 immediate children, then, you need to back up your context, adjust down for the first child, and call the first child's draw routine. When the first child is finished, you restore your context from the stack, but leave it on the stack, modify it again for the second child and call the second child's draw routine. When the second child is done, you can pull your context from the stack one last time, modify it down for the third child. But you don't need to push it back on to the stack this final time. When the third child returns, there is nothing more to do, and you return to your parent. The parent manages its own pull-restore from the stack.
Transforming and clipping in light of the view hierarchy
There is an upshot to code only being able to make a draw region smaller and more inset than it currently is. It relates to how the view hierarchy nests. Nothing is able to draw outside the defined draw region. And I mean, truly cannot draw outside the region, as long as you are using the provided drawing routines. Anything that would fall outside the draw region gets clipped automatically.
Let's look at how a simple view hierarchy might look, and how the context drawing system works with it.

Here we have the same 27 by 27 buffer, and a draw context configured for it. The colors indicate nesting depth.3 You can see, this hierarchy is 4 levels deep: White at the root, Red a level inside that, yellow a level inside red, and one of those yellow areas has a level nested inside it in blue. This style of hierarchical layout should look pretty familiar to web developers. The thing to notice is that no child region ever crosses over the bounds of its parent. It is common for one parent to contain more than one immediate child, but the children are always, in some way, smaller and/or inset from their parent. And that's the reason why the context can only ever be transformed to become smaller.
Let's think about how an application would use the drawing context to produce this sort of layout.
The main application code allocates the 3 pages for char data, and the 3 pages for color data. And sets the char origin and color origin pointers to the starts of these buffers. Next it sets the buffer width to 27, to define the aspect ratio of the buffer. It also begins by setting the width and height properties of the context struct to 27 and 27, such that the inital size of the context is now fully defined, bigger than which it can never be set. And that's good, because if anything made it bigger, they could overflow the end of the allocated buffers, and would likely lead to a crash or to data corruption.
In order for the draw system to use this context, this struct has to be passed to the system using the routine setctx. This structure is then copied into the system's working memory.
If we're doing a full (dirty) redraw, then the root level has to clear its context. There is a system call for this, ctxclear. This takes a single character and [applies the color, reverse, and petscii-to-screen translation according to the current context] (Updated: October 7, 2019) and fills the currently defined draw region with just that character and color. Only the region that is dirty needs to be cleared. In this case, we're clearing the entire buffer.
The root, white, level can have content drawn directly into it. Most of this will end up being over written by its children, but there is a bit of space at top middle and bottom that will not be over written. In a utility, for example, the topmost row of the buffer is drawn with the panel's titlebar. This consists of the close button, two characters of horizontal lines, the title of the utility, and then two more characters of horizontal lines. A stylistic choice of mine, and to maximize screen real estate, the remaining righthand side of the title bar is left transparent. BeOS also does something similar. I think it looks cool.


Speaking of transparency. The buffer is always a rectangle. However, one PETSCII value is reserved to represent transparent. This character is $A0. In standard PETSCII it's the reverse of space. Since the regular space has no pixels set, its reverse has the identical appearance. In C64 OS, if the value is $A0, it will be skipped over when transcribing this draw context to the screen buffer. But more on this later.
The root level contains two children, the two red rectangles. Before transforming for the first child, the context should be pushed to the stack with the system call pushctx. Pushctx takes no parameters, it just pushes the current context as is. Then the context can be shrunk. It's origin is in the same column, but one row down. To move the origin down a row, we simply add buffer width. In order to not risk overflowing the buffer, height would need to be reduced by at least 1 to compensate for the inset origin. But, in this case, we're actually reducing the height down from 27 to 12. At this point, drawing can be passed off to something other than the main code that initially configured the buffers and the context. Usually, hopefully, the passoff will be to a Toolkit view. So, let's imagine the child is a TKView.
The TKView is in control, it knows that it has two children, and how wide and how offset they are from itself. These are the two side-by-side yellow boxes of the top red box. The TKView then, as part of it's drawing, loops through its children. It pushes the context to the stack, and moves the origin down one and right one. It does this by adding buffer width again, but you note that it doesn't know how wide the buffer is, nor care. Only that adding buffer width from the context will move the origin down one row, for this particular buffer. Then it adds one to move right one. It must also adjust the width and height. In this case setting the width to just 6, much smaller than the initial 27. And the height it reduces from 12 to 10. Then it calls that child's draw routine.
Now we're in the topmost leftmost yellow region. Whatever this view is, it can draw itself however it wants. It can even draw itself however big it wants. But anything that overflows the bounds of the current draw region will be clipped automatically.
How does it do this? How does it clip, how do you draw into that region? How can you scroll the inner contents of that draw region if its contents are too big? Let's take a detour to get into the nuts and bolts of drawing, with scrolled offsets.
Drawing routines, with scrolled offsets
Let's say that we're the implementation of whatever that view is that's drawing into the first yellow box. We don't know where we're drawing to in memory. We don't really know how we're going to be clipped. So perhaps the only thing we do know is what content we have. Now let's say our content is 20 characters wide, by 18 characters high. Perhaps it is a list, 18 items long, where the longest item is 20 wide.
What we do is we pretend that we have a drawing region that is maximally large. We have the maximum width and height into which we can draw. Now, what are those maximums? They are unsigned 16-bit, measured in characters. In other words, they are from 1 to 65,535 characters wide, and from 1 to 65,535 characters high. We can draw anywhere we want inside this enormous virtual square. It's over a half a million pixels wide, and a half a million pixels tall. To start drawing we need to position the draw cursor. We do this by Setting the Local Row and Column. It's called local because it doesn't matter where this will end up in the buffer, or in memory. What matters is where the cursor should be relative to this view's own 16-bit by 16-bit square virtual canvas.
Passing more than one 16-bit number is a bit of a pain on the 6502 because it has only three 8-bit registers. So, as the KERNAL sometimes does when it needs to take more than 3-registers worth of data, it breaks it into two calls. The routine is setlrc, for set-local-row-column. Call it with the carry clear to set the row, which is passed as a RegWrd (a 16-bit word of data, X = Low Byte, Y = High Byte, which is the standard for C64 OS.) Then call a second time with the carry set to set the column, which is passed as a RegWrd again. After setting the local row and column, we set the draw properties by calling setdprops. The draw property flags are sent in the X register, and the draw color is passed in the A register. The draw properties are, PETSCII to screencode conversion, reverse, and direction of cursor travel.
With the cursor positioned and the draw properties set, you draw by making repeated calls to ctxdraw. The character to draw is passed in the A register, and the X and Y registers are preserved for easy looping over the view's data. Each time a character is passed in to draw, if PETSCII to screencode conversion is on, the byte is piped through C64 OS's PET2SCR routine. PETSCII, as it happens, only defines six of the eight 32-byte blocks. As you can see in my Programming Reference post, Commodore 64 PETSCII Codes, blocks 4 and 8 are undefined.

The C64 KERNAL also converts from PETSCII to screencodes when you call CHROUT ($FFD2) when the output device is the screen. However, the KERNAL's routine maps blocks 4 and 8 as blocks 6 and 7 respectively. Frankly, I don't really understand the logic behind the decision to map block 8 to block 7. In C64 OS, screencodes blocks 4 and 8 of are the only ones used for graphical symbols. So, the PET2SCR routine in C64 OS leaves a value in block 4 and 8 untranslated. This is actually very convenient, as it lets you drop graphical symbols into what is otherwise a string of PETSCII.4
If the reverse draw property is set, the 7th bit is inverted, just as with the KERNAL. Note that the PETSCII conversion to screencodes is done first, then the reverse. So, if you pass in a block 4 character, and it is left alone untranslated, if reverse is on, it will be swapped to block 8, and vice versa. That makes better sense to me than what the KERNAL does, which effectively makes block 8 unaddressable. The difference in C64 OS is that you may opt to define some of the block 4 characters as truely different than their corresponding block 8 characters, not just strictly the reverse of each other. But once you do that, you need a way to address both blocks.
Moving along.
Where does the character, (and its attendant color) actually get drawn to? The local row and column are applied to the origin of the current draw region, and its width and height. If the local row and column are beyond the right edge (the width,) or below the bottom edge (the height,) then the character gets drawn nowhere. That's the clipping in action. The character conversion, by the way, happens only after figuring out where to draw it. If it will not be drawn, it won't get converted, as that would just be a waste of cycles.
After calling ctxdraw, the local cursor advances by one. Note that, one of the draw properties is cursor travel direction. Unlike the KERNAL's screen editor, the C64 OS draw context can make the cursor advance vertically. This is convenient for drawing vertical strips, such as a vertical scrollbar, or a draggable vertical splitter. Internally, of course, a vertical advance consists of just adding the buffer width to the cursor.
Something still doesn't make sense though. If our content is bigger than the draw region, and the draw region automatically clips at its own bounds, then, how can we ever see or render the content that overflows? For this, we look back to our original context struct.
You may have wondered what the Offset Top and Offset Left are all about. These values are also unsigned 16-bit. And they serve to negatively offset the origin of the virtual 16-bit by 16-bit drawing canvas from the origin of the current draw region. Like this:

The blue square, (both tones together lighter and darker), represents the virtual canvas onto which ctxdraw is capable of drawing. When we set the local row and column, in 16-bit, those are cursor positions into this blue square. It's the local drawing coordinate system for the current view. The yellow rectangle is the draw region as defined by the current drawing context, which ultimately backends on real memory, somewhere inside the pgalloc'd buffers. The context's Offset Top and Offset Left properties define how far the blue virtual coordinate system is offset from the draw region's origin. This is indicated by the black arrows. In this particular example, Offset Top is set to 3, and Offset Left is set to 5.
Now, how does this affect clipping while drawing? There are 5 relevant regions, which I've labeled above, into which the cursor can be set with setlrc. If we set the cursor to, say, row 2, column 3, that would put it into that top left region labeled as "A". It's both above and before the origin of the draw region. Next, because the cursor advances only right or down, there is no way that the cursor will ever advance into the yellow draw region. If the cursor is set to advance right, it will advance through A and into C, through C and into E and never pass through the draw region. Or, if the cursor is set to advance downward, it will pass through A and into B. Then through B and into E and again never pass through the yellow draw region, labeled above as D.
The draw context knows this. After any call to ctxdraw, it returns with the carry either set or clear. If it's set, that means no subsequent call of ctxdraw—with the current cursor position and draw properties—will ever result in anything that isn't clipped. This allows your drawing routine to abandon drawing that row (or that column) and move on to the next.
The situation is similar for regions B and C. If you set the local row and column such that it falls into region B, then a rightward advancing cursor will eventually cross into the drawing region, region D. Then eventually it will leave the right edge of D and into region E. At that point ctxdraw will start returning with the carry set to let you know. In region C, it's the same thing, only vertically. If you're in region C with a rightward advancing cursor, it immediately starts returning with the carry set. If you're in region B with a downward advancing cursor, same thing.
If you are in region D, then it starts of drawing and the cursor can advance in either direction, but once it leaves either the right or bottom edges of region D, the carry starts getting returned set after each call. Lastly, region E is that nether region. If the cursor starts there, or ends up there, the cursor will never progress into the draw region.
Scrolling and efficient drawing
The idea here is that the Offset Top and Offset Left are able to slide around the blue virtual canvas of the current view so that different parts of it become visible through the little peep hole that is the currently defined draw region. But, how do those context offsets get set?
You can programmatically change the Offset Top and Offset Left values. But to be honest it was not my intention that anyone would ever do that manually. Generally speaking, if you have a view that has content that is bigger than the available space, and you want to be able to see or get at all of that content, then you need to embed the view inside a TKScrollView. A TKScrollView in C64 OS can only take one child, and can be set with flags to scroll either vertically, horizontally or both.
The TKScrollView requests from its one child how tall and/or how wide it is. Then it draws scrollbars to allow the user to scroll. To keep things simple, let's just pretend that scrolling only happens vertically, even though everything I'm describing can be applied also to horizontal scrolling. If the user moves the scrollbar, the TKScrollView remembers internally its own scroll offset. When the TKScrollView has its draw routine called, first it draws its scrollbars, then it shrinks the context's draw region to the part of itself that shows its child. Then it adds its own scroll offset to the context's Offset Top. Then it calls the child's draw routine.
It is super important that it "ADDs" to the context's current Offset Top, and not that it replaces the context's Offset Top with its own. The reason is because you can nest multiple scrollviews one inside the other. It can be tricky to visualize what happens if a scrollview is inside another scrollview, and itself is only partially visible. But, I promise you, the progressive shrinking of the context's draw region works.
As I said above, the virtual canvas onto which any view is able to draw, using local coordinates, is huge. It's an area that covers nearly 275 billion pixels. For an 8-bit computer that's a lot of space. There are several questions raised by even having such a large space. Some questions might be, why do you need that much space? and, How is there enough memory for that much space? To understand why you need so much, you have to think about the ways in which content can be structured such that it overflows a visible area and needs to be scrolled. In my mind, there are two main ways that content becomes overflowingly large.

The first way is raw data content. It could be a big block of text, or it could be a list of many shorter strings. The list is a bit easier to think about, so let's stick with that. A list could be, for example, a list of file names read in from a directory. Each file has a short name, and each one is to be displayed on a subsequent line. If you limited the local coordinate system to 8-bits, you would max out at only being able to draw 256 lines of content. That's just 256 file names, for example. Is that enough? A 1541 directory can only hold 144 files. But, that's the absolute smallest of the storage devices compatible with a C64. An SD2IEC, reading in from a FAT32 directory can have a lot more than 256. It would be nice to not be limited to just 256 rows of content. Is it reasonable to make the limit higher though? What about our memory constraints? In the case of the list of files, you need at least 16 bytes per file name, that's 16 files per page. 256 files fits in just 16 pages. But, C64 OS has around 140 memory pages available. So there is more than enough memory to hold more than 256 file names.
256 rows is the limit of 8-bit. The next step up is 16-bit. That might be a bit excessive, but, it's virtual real estate, that much space doesn't actually need to be allocated in memory. With 16-bit coordinates the canvas is 65,535 rows tall and 65,535 columns wide. As you can see in the comparison visualization above, it's insanely bigger. The 8-bit canvas size is a barely visible speck beside the 16-bit canvas. (Both are to scale, 1:256 their size in pixels, or 1:32 their size in character cells.)
You don't need to have 65,000 items before 16-bit numbers become useful. You only need to have something that exceeds 8-bit numbers, like, 257. So let's say you have data structures in memory for 260 file names (you'd need a minimum of 17 pages of memory,) now you have to draw them. So you could start at index 0, set the local row and column to 0 and 0, and the cursor to advance rightward, and then output the first file name. Next you loop, set the local row to 1, and output the next file name. Repeat until you get to the end of your data structures and have printed out all of the file names. Along the way, the drawing context will clip any rows that fall above or below the draw region as defined by the Height and Offset Top. Characters clipped away aren't draw into a 65535 x 65535 byte buffer, they're just not drawn anywhere. Only those characters not clipped actually get copied into the buffer that's already been allocated for the drawing context. Bingo, it's that easy.
Wait, no, something's not right. Technically, that would work. But it would be extremely slow and inefficient. Everytime you tried to scroll by one row the scrollview would adjust the Offset Top by 1, and then call the child's redraw routine. The child would then have to redraw all 260 file names, only for a slightly different subset of them to pass through the tiny clipping peep hole. Instead, if you know that you're the kind of view that has to draw copious amounts of data, such as hundreds of lines, then you can take some simple steps to dramatically decrease draw time and increase efficiency. You need to know where to start drawing, and you need to know when to stop.
There are at least two situations you could be in for this as well. Let's say you're a long scrolling list, but you yourself and none of your parents are contained within any scrolled areas. That's the simple case. It's much like the example we're in, the yellow rectangle contained within the red rectangle, contained within the root of the drawing context, none of the yellow rectangle's containers are themselves scrolled. In this case, the context's Offset Top is equal to the lists scroll offset. If the offset is 10, then you can skip the first 10 file names in the list, set your very first local row to 10, and the very first one you spend any time trying to draw is already inside the drawing region and isn't getting clipped.
When you get to the bottom of the drawing region ctxdraw starts returning with the carry set. Check for the carry inside your loop and when it gets set, stop looping.
There is a more complicated situation though. Your scrolling list could be embedded inside a scrollable area that itself is offset by some number. In this case, the context's raw Offset Top property will not be equal to the list's scroll offset. To more reliably determine the list's scroll offset it should be requested from the parent's own internal scroll offset properties. This, however, goes beyond the role of the context drawing system and into the design of the toolkit classes.
I said there was another way in which content can overflow the bounds of its parent, get clipped and thus be in need of scrolling. Rather than just one view that handles drawing a large amount of data, there could also be some arrangement of many views which when placed beside each other eventually overflow the space alloted to them by their parent. I also said that a TKScrollView only supports one child, and gets its scroll height and width by asking the child how wide and tall it is. All of that is true. However, an ordinary view is able to contain multiple child views. So, you could, for example, create a form that is made up of a long list of label/textfield pairs. Each label and textfield is its own view, added to a single parent and anchored and positioned within that parent resulting in some overall size that scrolling is required to see it all.
We're sort of dipping into toolkit again here, but I'll just mention it for completeness sake. TKView loops over its own children calling each of their draw routines. However, view is also aware of the context's Offset Top, Offset Left, Width and Height properties. So, view can calculate, on a child-by-child basis, if that child is entirely outside the draw region. If it is, it will not call that child's draw routine. So, if you are the kind of view that only has to draw a small amount of content, such as a single short text label, your draw routine only gets called if at least some portion of your content will not be clipped. In this case, it is much simpler—from a coding perspective—to simply draw yourself in your entirety and let the context clip away the bits that aren't visible.
Unrolling the, Unrolling the, Unrolling the Recursion
As you can no doubt see, the drawing context, along with the toolkit and its views, are highly recursive. Above, we have drilled down several levels, into the yellow rectangle at the top left. Here's a reminder about where we were.
In our example, that top left yellow box contained a scrollview, which contained a view that knows how to draw a list of strings from data structures, and which efficiently pays attention to the offsets of the parent to only draw the bare minimum necessary, or, perhaps allowing some small elements to be clipped. Our filenames are 16 characters wide, our yellow draw region is 10 high but only 6 wide, one of which is taken up by a scrollbar, leaving 5 wide and 10 high. We could add in a horizontal scrollbar, making the content 9 high, and allowing the user to scroll left and right to see the complete file names. Alternatively, we could just ignore the horizontal scrolling and allow the context to clip the ends of the file names and that's just that.
There are many places in macOS, for instance, where there is insufficient horizontal space to show items in a list, and there is no horizontal scrolling. The list items just get ellipsed. macOS likes to use an ellipsis on the clipped text.5

Now, after all that, we're done drawing our Yellow rectangle. There is nowhere deeper to go. The scrollview's draw routine returns. Of course, it was called by the top red rectangle's draw routine. This draw routine had pushed the context before shrinking it for its first child. It now pulls the context using the pullctx system call. This, like pushctx, takes no parameters. It simply restores the context to the state it was in at the time of the last push. Hallelujah, you do not need to worry about whatever modifications the children may have made or what state they may have left it in.
Check for another child, which the red rectangle has, it's the second, wider, yellow rectangle on the right. Since this is the red rectangle's last child, we don't actually need to push the context to the stack. Modify it by shrinking it again. This time we'll be modifying it to suit the origin, width and height of the second child. Then call that child's draw routine.
Recurse, recurse, recurse, until every visible view is drawn

Because everyone likes a good recursion joke
What to do with a Drawn Context Buffer
All of the above is what happens when we are forced to redraw the a user interface because it is out of date (dirty) or otherwise corrupted. Remember back now, if we were simply using the main screen buffer as our drawing buffer, then every time anything was drawn into the screen it would corrupt our previously drawn data. Then, when asked to redraw, we would have no choice but to completely redraw our UI, which would likely involve redrawing the entire view hierarchy.
But, when we instead choose to allocate a special private buffer just for this process's UI, once we draw into our private buffer, nothing else will overwrite it. That's why it's called private after all, because only the code of this application will ever touch this memory.
You should be able to see the parallel between the C64 OS's private draw context buffer, and the backend image buffer created by the HTML5 canvas tag. The appearence of neither one needs to be recomputed unless something is specifically modifying the apparence of that particular buffer.
Once we can be sure that other code is not arbitrarily corrupting our data, it no longer becomes necessary to completely and totally rerender a view hierarchy from scratch. Instead, individual toolkit views can flag themselves as dirty. Perhaps we grab a scrollbar and move it down. The scrollview would set its own dirty flag. (I'm still working this part out, but a global flag that some part of the view hierarchy is dirty should be set.) Because we have just intentionally dirtied ourselves we have to tell the system that our layer needs a draw cycle. The next loop around the main event loop will cause the system to call our layer's draw routine.
In our layer's draw routine, we see that the view hierarchy is out of date. This begins a process of recursively walking the view hierarchy, modifying the context as it goes, looking for views marked dirty. The dirty views then redraw themselves and their children as described above.
The dirty flags mean that a single checkbox that gets checked does not result in every view redrawing itself. Only the checkbox redraws itself.
Getting a Buffer onto the Screen
If part of the view hierarchy was dirty, we redraw that part of the hierarchy, into our specially allocated context draw buffer. Fine. But how does that private buffer get onto the screen?
In addition to when we need to update a dirtied view hierarcy, there is also the situation where our layer is told to redraw but our buffer is unchanged. In fact, this happens all the time. Like, when a menu flys out overtop of our layer and then closes again. Our layer is asked to redraw itself, but nothing in our layer's private buffer changed. This is where having the private buffer makes the layers above it much snappier.
Regardless of whether we updated our private buffer or not, the last step is always to copy our buffer to the main screen buffer. The system, the Screen module, will call our layer's drawing routine in the correct order. Thus, it is safe at this time to draw anything we want to anywhere in the screen buffer, and we will not corrupt layers above us.
The Screen module provides a special system call, ctx2scr. This routine copies the buffer defined by the current draw context to the screen buffer. Thus, it is not necessary to specify any of the details about our buffer that are already captured by the context. But, we have some special opportunites here. The screen itself, is very small. 40 by 25. And it's probably going to be that size until the last VIC-II chip on earth gates those final electrons through its ancient creaky circuit paths. This is good news for us. We can use the X and Y registers to specify where on the screen to copy the context buffer to.

The screen is so small in fact that the width is less than half of an 8-bit maximum value. The X register is used to pass in the column, but it is signed. This allows the origin of a buffer to be positioned -128 columns off the left edge of the screen. Or, up to 87 columns (127 - 40) off the right edge of the screen. In practice, this allows you to position a buffer partially off the left or right edges of the screen. I was very surprise when I got my first Amiga, an A1200 with WB3.1, that WorkBench windows, much like the windows of the Wheels Dashboard, cannot be moved partially off the edge of the screen. +1 for C64 OS!
The Y register is used for setting the row into which the context buffer's origin should start. At the moment, the row value is unsigned, which prevents you from positioning a buffer up and off the top of the screen. But it can be so close to the bottom that the bottom of the buffer falls off the bottom edge of the screen.
I may change the Y register to be signed as well. But for now, the main purpose of being able to reorigin a context buffer into the screen buffer is to allow utilities to be moved about like windows. These can only be dragged about by their top title bar anyway, which makes it impossible to ever drag a window such that it is positioned off the top of the screen. This is actually a limitation artificially imposed by macOS, and it feels sensible to me. The only reason I might change it in the future, is to be able to animate a modal window down from the top and into the middle. A window that isn't manually positioned or moved. We'll see.
Earlier I mentioned that there is a special character, $A0, that is defined as transparent, and that we'd return to this topic. Here we are. The transparent byte comes into play with ctx2scr. When a context buffer is copied into the screen buffer, any byte of $A0 that is encountered in the source buffer is skipped over and nothing is copied to the screen buffer. This is typically done for the narrow titlebars of utility panels, but it can be used in many other clever ways to add regions of transparency in the middle of a panel.
The Screen Buffer
There is only one last thing to talk about. I have been very careful in the discussion above to always refer to copying a context buffer to the screen buffer, not to the screen. Or, that you can use the main screen buffer as the direct target of the context drawing, but not that you can use the screen in that way. Lest anyone think I'm being pedantic, when I say the screen buffer, I really mean the screen buffer and not the screen.
Near the top of the section of this post that begins to discuss the C64 OS Context Drawing System, I mentioned very briefly that the splitscreen mode is too complicated to get into in this post. And, it is. All I want to say is that, screen matrix memory is used by the VIC-II both for the screen codes to draw while in text mode, and also as primary or supplementary color data for HiRes or Multi-Color bitmap modes. And because C64 OS supports text mode/bitmap mode splitscreen, with the position of the split controllable by the user, ordinary screen memory cannot just be freely written into. Therefore, C64 OS buffers screen matrix memory, and textmode color memory.
The system call ctx2scr always copies from the private buffer into the system's screen buffer. And, when I said that the menu layer doesn't use a private buffer, but instead renders itself directly into the screen buffer, that's going into the screen buffer, not straight into screen matrix memory.
The last step of the draw cycle copies the screen buffer and screen color buffer into the real memory areas out of which the VIC-II actually draws. There are two big benefits to this double buffering. The first is that you never see compositing artifacts on the real screen, no matter how long it takes for a complicated UI to update itself. I initially introduced the main screen buffer in order to get rid of horrible screen flickering that would occur when the underlying application would redraw itself prior to a utility panel that was being moved redrew itself in its new position, and the screen refreshed in the middle. There is just not enough time for everything to redraw and get recomposited in less time than a complete a screen refresh.
Again, GEOS doesn't even try. You painfully watch every line and character get drawn on the screen, as it takes many screen refreshes to redraw everything. And it would be even slower if you did try to double buffer, as a single screen is only 2K in C64 OS, but 9K in GEOS's bitmap mode. Memory would also be horribly impinged. Even with C64 OS's double buffered screen, only 1K of usable space is lost, and the other 1K for color, as well as the actual screen matrix memory are tucked away in the ram under I/O.
Only much later did I sit down to implement C64 OS's splitscreen mode. And, all of a sudden, the existence of the extra screen buffer made managing the splitscreen fairly straightforward. There are only two pieces of code that actually care where the split is. The system status bar draws itself in the row preceding the split. And the screen module adjusts how it copies the screen buffer to screen matrix memory, and that's it.
Wrapping Up
Last month I lamented that I wanted to keep up my pace of making 2 posts a month. It is already the 27th of March, and this is my first post this month. However, at 14,500 words long, I feel justified in only having had the time to get out one post.
This one has been a doozy. I've spoken about it in the past, but mostly only during planning phases. Many things about it had not been finalized, or implemented and far from working. Now, everything described above (with the exception of some of the toolkit examples) is actually tested, working and in use by the App Launcher, TestGround (an app I use for testing various features of the OS), and numerous utilities.
As always, comments, questions, suggestions welcome.
- Alternatively, rather than a color, the fill style could be a gradient object. But that exceeds the scope of what we're going to cover here. [↩]
- I believe the Commodore 128 made some improvements in this area. You can use BASIC 7.0 commands to define a "window." A rectangle inside the screen matrix. Then as you print characters that flow off the edge of that window, they continue onto the left edge of that window, regardless of how the window is placed within the screen. That's an improvement for sure. [↩]
- I've drawn this image with unusually thick (1-character width or height) margins around each view. Normally you wouldn't do this, but with just colored blocks, you can't see the hierarchy if I don't put in these margins. [↩]
- Exactly what the KERNAL is doing is complicated. The KERNAL never maps a PETSCII value directly to a reversed screencode. Meanwhile, screencodes in block 4 correspond with the graphical symbols of PETSCII's block 6. So, this is exactly the same as in C64 OS. But in the KERNAL, mapping block 8 to block 7 is a PETSCII mapping, which happens before the conversion to screencodes. So if you $FFD2 a value of $E0, it first maps it to PETSCII $C0, which it then converts to a screencode of $40, unless the screen editor's reverse mode is on, which then maps that back to... $C0! As I say, it's complicated. [↩]
- Using 3 full character widths for 3 periods would be an insane waste of real estate. But, you never know, maybe one of the custom characters in the standard set could be an ellipsis (…) in one character. Something to think about. [↩]
Do you like what you see?
You've just read one of my high-quality, long-form, weblog posts, for free! First, thank you for your interest, it makes producing this content feel worthwhile. I love to hear your input and feedback in the forums below. And I do my best to answer every question.
I'm creating C64 OS and documenting my progress along the way, to give something to you and contribute to the Commodore community. Please consider purchasing one of the items I am currently offering or making a small donation, to help me continue to bring you updates, in-depth technical discussions and programming reference. Your generous support is greatly appreciated.
Greg Naçu — C64OS.com